Setting Up a Custom Email for Your Domain: A Serverless, Free, and Convenient Solution

Having a custom email address for your domain adds a professional touch to your online presence. However, traditional email hosting services can be costly and sometimes complicated to set up. In this article, we’ll explore a serverless approach to setting up a custom email for your domain that is both free and convenient to use. By leveraging Cloudflare’s email routing, SMTP2GO for outbound emails, and Gmail’s “Send Mail As” feature, you can create a seamless email solution tailored to your domain’s needs.
My Personal Experience with Custom Email and Gmail
As an avid user of Gmail, I understand the convenience it brings to managing my emails. In the past, Google offered free email hosting for custom domains through its Google Workspace / Google Suite program. Unfortunately, they have since discontinued this free offering, leaving users searching for alternative solutions. That’s when I discovered the power of a serverless setup, combining Cloudflare, SMTP2GO, and Gmail’s features to create a seamless and cost-effective custom email solution.
Step 1: Domain Setup and DNS Configuration
Before diving into the email setup, ensure you have a registered domain and access to its DNS settings. Cloudflare offers a reliable and free DNS management service that we’ll be utilizing for this tutorial. Follow Cloudflare’s instructions to create an account, add your domain to their platform and update your domain’s DNS records accordingly.
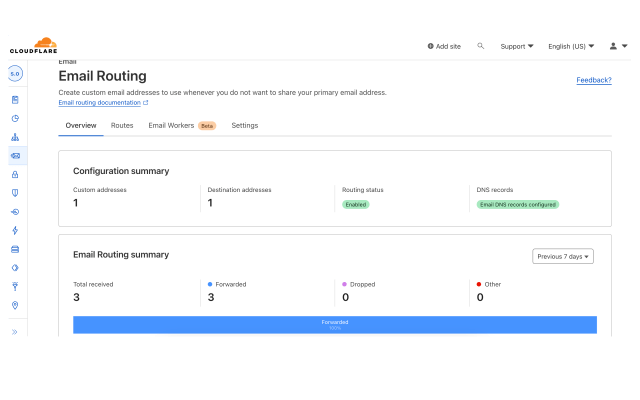
Step 2: Cloudflare Email Routing
Cloudflare’s Email Routing feature allows you to receive emails for your custom domain without the need for a dedicated email server. Here’s how to set it up. In your Cloudflare dashboard, navigate to the “email” section and set up email routing. Allow Cloudflare to auto-populate the DNS entries, and that’s it! Emails to your new domain, will now be forwarded to an account of your choice, in my case, it was my gmail account.
Step 3: Outbound Email Configuration with SMTP2GO
SMTP2GO is a reliable third-party SMTP service that enables you to send outbound emails from your custom domain. To configure it:
- Sign up for an SMTP2GO account and add your custom domain.
- Follow SMTP2GO’s setup instructions to authenticate your domain and obtain the required SMTP credentials.
Step 4: Sending Emails via Gmail’s “Send Mail As” Feature
To conveniently send emails from your custom domain using Gmail’s interface, utilize the “Send Mail As” feature:
- Access your Gmail settings and navigate to the “Accounts and Import” tab.
- Under “Send mail as,” click on “Add another email address” and enter the name and email address associated with your custom domain.
- Uncheck send as alias, to ensure that the email sent is not associated with your original gmail account.
- Configure the SMTP server details using the information provided by SMTP2GO. This ensures that outgoing emails from Gmail are sent using your custom domain’s SMTP server.
The Convenience of Gmail’s Labeling and Tagging
As someone who heavily relies on Gmail for both personal and professional communication, I understand the value of being able to keep my inbox organized. With this custom email setup, you can create specific labels and filters within Gmail to automatically categorize incoming emails based on criteria such as sender, subject, or keywords. This allows you to stay on top of important messages, prioritize your workflow, and easily locate specific emails when needed.
Moreover, Gmail’s powerful search functionality extends to your custom domain emails as well. You can use the search bar in Gmail to quickly find messages from specific senders or containing certain keywords, making it effortless to locate past conversations or important information.
Caveat: Maximum Limits of Free Tiers for Cloudflare and SMTP2GO
While the serverless custom email setup we’ve discussed in this article offers a cost-effective solution, it’s important to be aware of the maximum limits imposed by the free tiers of Cloudflare and SMTP2GO. These limits may affect the scalability and usage of your custom email system. Here are the considerations:
- Cloudflare: The free tier of Cloudflare’s email routing service has certain limitations. For instance, the free tier may have restrictions on the number of email forwards, email accounts, or total monthly email volume. If your email usage exceeds these limits, you may need to consider upgrading to a paid plan or exploring alternative email routing solutions.
- SMTP2GO: Similarly, SMTP2GO’s free tier has its own limitations, typically including a cap on the number of outbound emails you can send per month. While this free tier is generous, offering up to 1,000 emails per month in some cases, if you anticipate higher email volumes or require additional features, you might need to upgrade to a paid plan or explore other SMTP service providers.
Understanding the maximum limits of the free tiers is crucial to ensure your custom email system operates within the defined boundaries. Regularly monitor your email usage and evaluate whether it aligns with the free tier limits provided by Cloudflare and SMTP2GO. If your needs exceed these limits or you require more advanced features, consider upgrading to a suitable paid plan that aligns with your requirements.
Conclusion
Setting up a custom email for your domain doesn’t have to be complicated or expensive. By utilizing Cloudflare’s email routing, SMTP2GO for outbound emails, and Gmail’s “Send Mail As” feature, you can create a serverless, free, and convenient email solution tailored to your domain. With the added benefit of Gmail’s labeling, tagging, and search capabilities, you can efficiently manage your emails and maintain a professional online presence. Embrace this setup, and enjoy the seamless experience of having a custom email address that aligns perfectly with your domain and integrates seamlessly with gmail.